Dialog Boxes
Calling custom Dialog boxes from a SmartCAM macro is very simple. The following tutorial will show how to create a Custom Dialog Box using Visual CTK. Then create a macro to use the Dialog and finally to interpret the results.
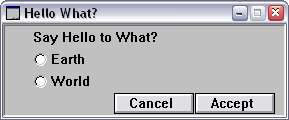
This simple example is yet another Hello World style program. When the macro is run a dialog will open prompting the user to pick between Earth and World. When the selection is made a message box will be displayed saying "Hello selection".
Create the Dialog Box
Complete the following steps to build the dialog box needed for this example.
Create New Dialog PCB
Launch Visual CTK and then create a new Dialog PCB file. This can be done by selecting the appropriate icon on the toolbar or by using File - New and selecting Dialogs on the New CTK File dialog.
When the Resources dialog box is opened, select New. The Dialog Properties
box is displayed. Enter the following:
- Dialog Name: Hello What?
This is the text displayed on the dialog boxes' title bar. - Dialog ID: 1
The ID reference for this dialog. You can have multiple dialogs in a single PCB file, but each must have a unique numeric ID number. - Dialog Size: Width is 30 and Height is 3.
- Dialog Position: Keep default values.
Press OK to display the dialog box and add UI components.
This dialog needs two UI components: a text Label to tell the user what to do, and an Option selector to allow user to pick the output.
Click on the dialog box representation (it has the title text "Hello What?"). The Token Palette will be displayed.
Add the Label
Select the Label icon from the Token Palette. ![]()
Click on the dialog representation and set the initial location for the label. A Token
Properties box is displayed. In the Label: field enter: Say Hello to What?
Then press OK.
The text Label is displayed on the dialog box.
Add the Option selector
Select the Option icon from the Token Palette. ![]()
Click on the dialog representation to set the initial location for the option list. A
Token
			Properties
box is displayed. Enter:
- Variable: HWWHAT
This is the variable name to hold the results of the Option selection. - Option Item:
Type in Earth, then press the Add button. This adds Earth to the list box. Now type in World and press Add. This list now contains "Earth" and then on the next line "World". The options need to be in this order to get the correct results from the macro.
The items in the list box; Earth and World, will be displayed on the dialog. When the user
Accepts the dialog to close it, the results of this selection will be passed to the macro in the
variable #HWWHAT. The first item in the list is item 0, the next item is item 1, and so
forth.
Press OK to close the properties dialog.
Positioning
Use the Pointer icon, the first icon on the left, and click and drag the UI
components on the dialog to look like:

Save the PCB file
Click on the red "X" icon to close the dialog representation.
Use File - Save As and save the file as HW.PCB. For purposes of the tutorial,
create a C:\MACROS path and save the file there.
Create the Macro
The macro will call the dialog box, wait for the user to make a selection and close the dialog, then display the appropriate "Hello" message.
// HW.MCL
// Hello What? MCL file
// Uses custom Dialog to select what to say hello to.

VAR_REMOVE[VN="HWWHAT"]
VAR_REMOVE[VN="HWOPT"]

STRING:#HWOPT       // Output string
INTEGER:#HWWHAT=0   // Return from Dialog, 0 is default: "World"

// Display Dialog
DIALOG[FN="C:\\TEMP\\HW.PCB", ID=1]

//	Display correct message based
IF (#HWWHAT = 0)
   #HWOPT="Earth"
ELSE
   #HWOPT="World"
ENDIF

PAUSE[TX="Hello " + #HWOPT]
The two VAR_REMOVE[] commands make sure the two variables needed for this
macro have not already been set to something.
#HWWHAT is the variable associated with the Option buttons on the
PCB dialog. If a value is set for the variable before the dialog is called, this becomes
the default value for the dialog. In this instance, the default is 0 or "Earth." If
#HWWHAT were set to "1", then the default would be "World."
The DIALOG[] command displays the dialog box. The FN parameter
is the full path and filename of the PCB file to use. The ID is the dialog
box ID.
When DIALOG[] is called in the macro, the dialog box is opened. Control will
not return to the macro until the dialog box is closed. If the user presses the Cancel
button the dialog, the dialog is closed and the macro ends. If Accept is chosen,
the dialog is closed and control returns to the macro.
Save the macro in a file named HW.MCL in the C:\MACROS temporary
directory.
Run the Macro
Start your application and select Macro - Execute. Enter the name of the macro to
run, in this instance C:\MACROS\HW.MCL.
Select one of the options on the dialog box and press Accept.
The message box displayed contains the appropriate text.
Related Topics